
Navigating Gorilla
- Projects
- Version Control
- Gorilla Glossary
Overview
This guide covers the basics of how to save, delete, and restore your work in Gorilla, no matter what tool you're using. It also features a handy glossary so you can see what different terms mean at a glance.
Browse the topics in the menu for more information.
Creating Projects
From your Gorilla homepage, click 'Create New Project'.
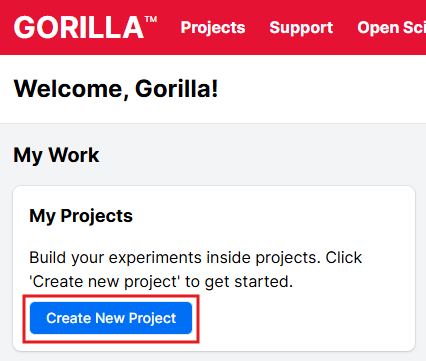
Projects are like folders, keeping related questionnaires, tasks and experiments together in one place.
Enter a memorable, unique name for the project. If you like, you can enter a description as well.
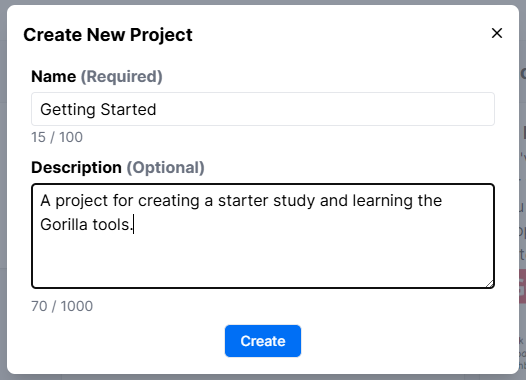
Adding a description to your project is a great way to make it easy to find later, especially if you have a lot of collaborators or are supervising a lot of student projects!
Click Create. Your new project opens.
Archiving and Unarchiving
In Gorilla, instead of deleting projects, experiments and activities, you can archive them. This hides them from view, but means you can always recover them if you change your mind.
Archiving
To archive a project:
- Open your Projects page.
- Click the Options menu to the right of the project you want to archive.
- Click Archive.
To archive an experiment or activity:
- Open the Project that contains the asset you want to archive.
- Click the Options menu to the right of the asset.
- Click Archive.
Archived projects and assets are hidden from view by default.
Unarchiving
To unarchive (restore) a project:
- Open your Projects page.
- Click Open Archive at the top.
- Click the Options menu to the right of the project you want to unarchive.
- Click Unarchive.
To unarchive (restore) an experiment or activity:
- Open the Project that contains the asset you want to unarchive.
- Click Open Archive at the top of the 'Experiments' or 'Tasks & Questionnaires' section, as appropriate.
- Click the Options menu to the right of the asset you want to unarchive.
- Click Unarchive.
The project or asset becomes visible again in the default view.
Version Control
Gorilla automatically saves your changes as you go, so you don't need to worry about losing your work. But you can also use our version control tools to save specific versions of your experiments and activities, making it easy to roll back if you make a mistake.
Browse the topics in the menu for more information on how to commit your changes, view previous versions, and restore a previous version.
This guide focuses on Experiment Builder. By default, activities (tasks and questionnaires) are automatically committed when you commit the experiment, so you don't need to worry about committing them separately.
However, if you choose, you can also separately commit versions of activities by opening them in Task Builder, Questionnaire Builder, Game Builder, or Shop Builder, and following the same process. You can then manually select a version of the activity to use in your experiment by selecting 'Fixed version' instead of 'Auto-update' in the node settings.
Committing Changes
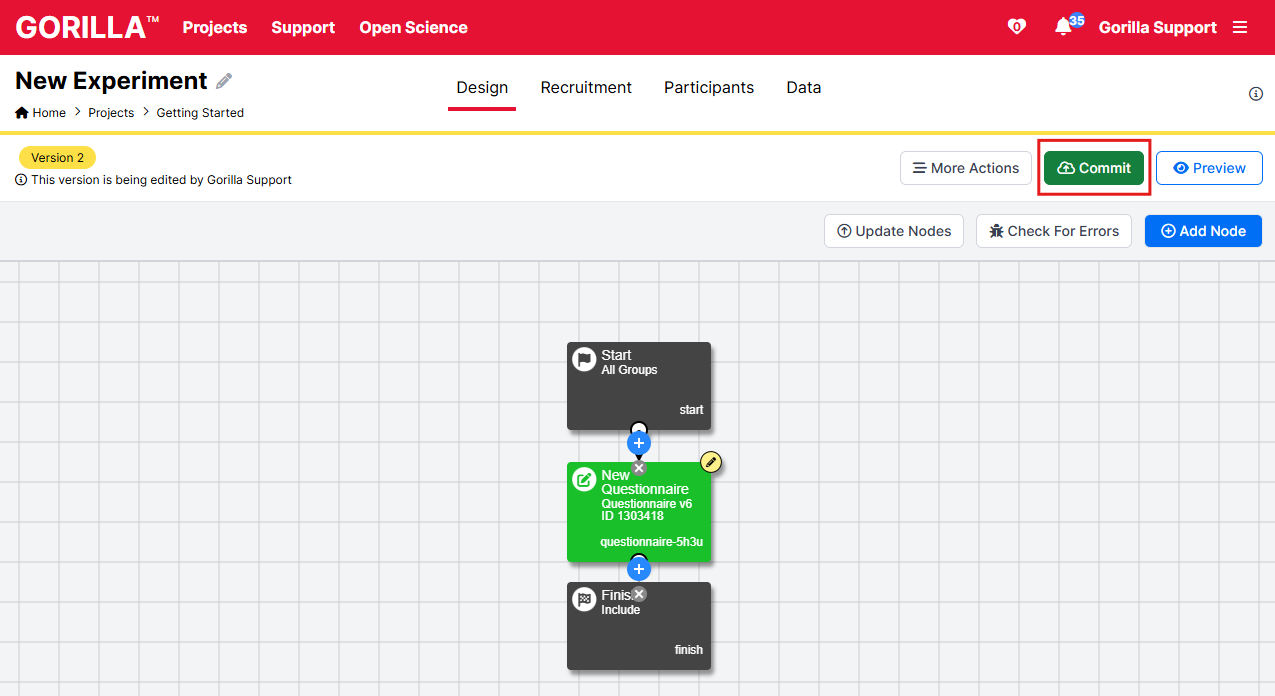
When you want to save a version of what you're working on, click the green Commit button at the top right:
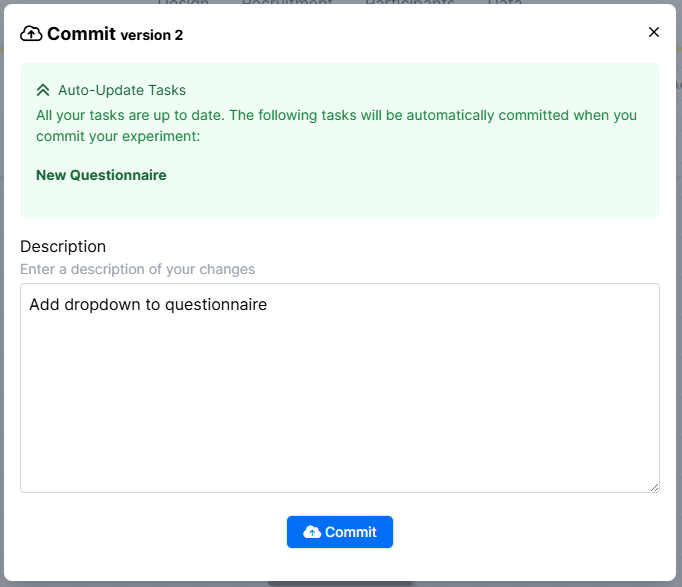
The Commit window pops up. Enter a description of your changes and click Commit:
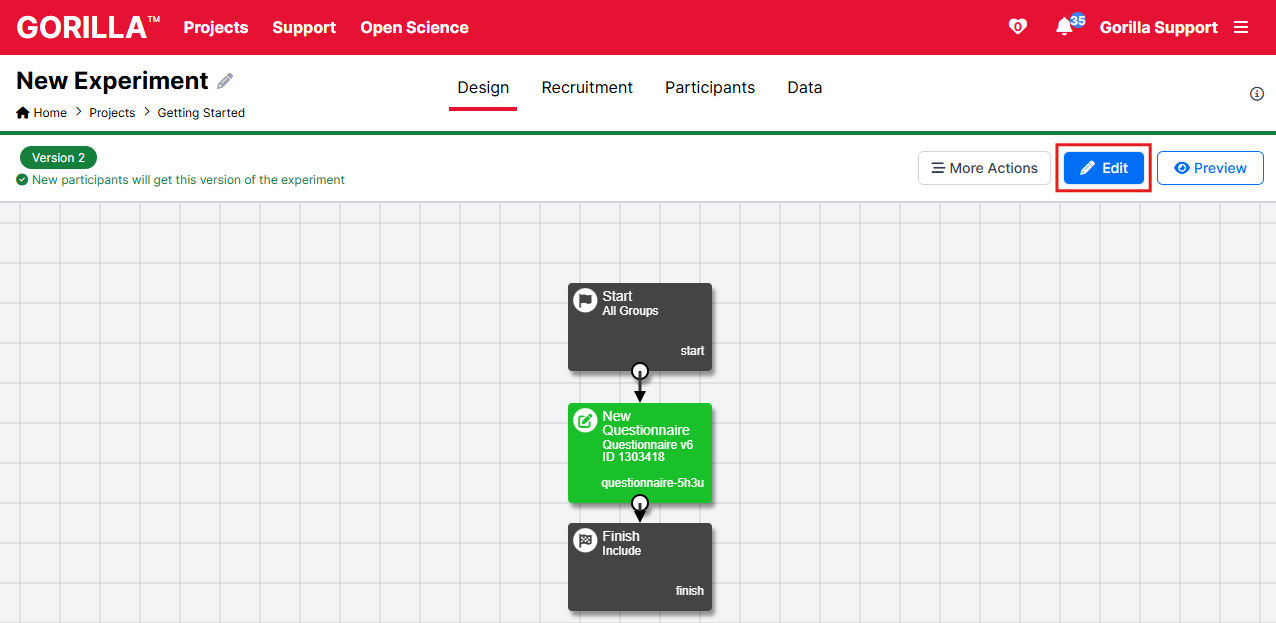
The yellow Version label at the top changes to green, showing that your changes have been committed. To make further changes, click the Edit button that has now replaced the Commit button at the top-right:
Viewing Previous Versions
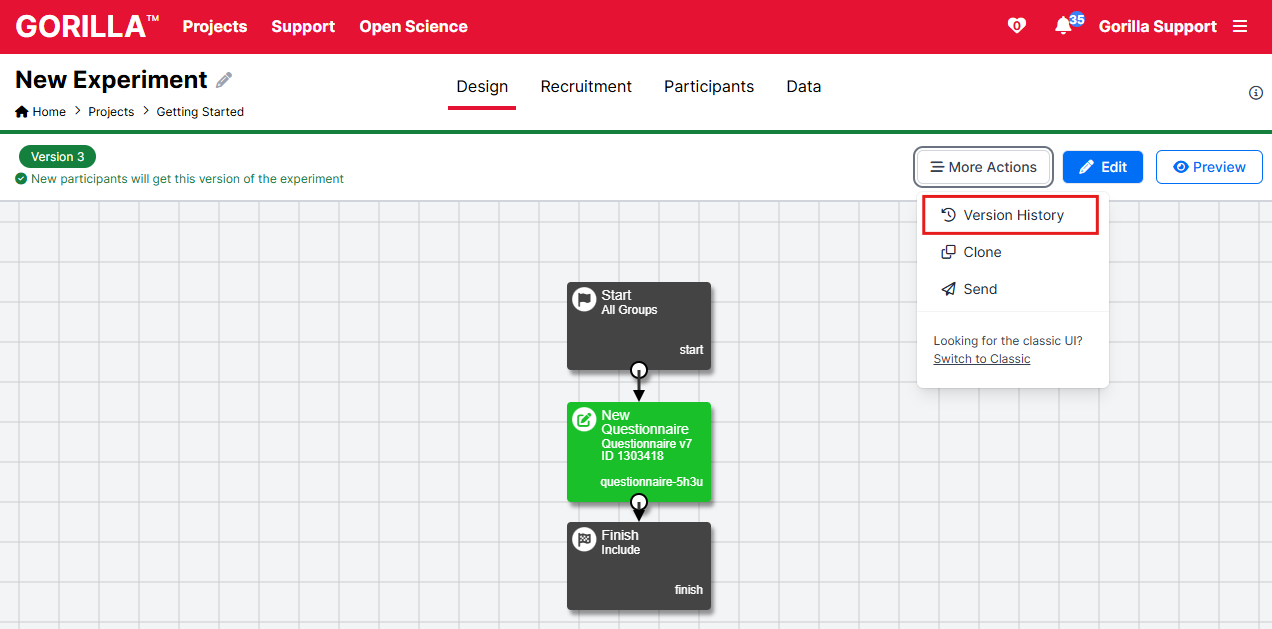
To view previous versions of what you're working on, click More Actions at the top right and select Version History:
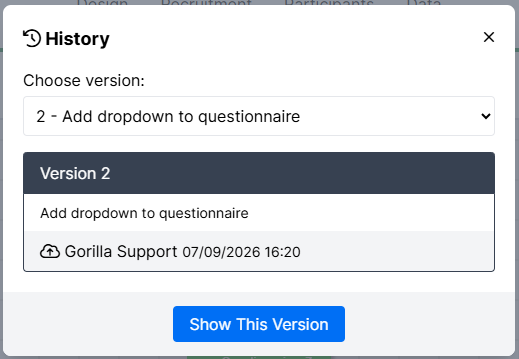
The Version History window pops up. Select the version you want to view from the dropdown menu and click 'Show This Version':
Restoring an Old Version
To roll back to a previously committed version, first select the version you want to restore by following the steps in Viewing Previous Versions.
Once you are viewing the version you want to restore, click More Actions at the top right and select Restore:
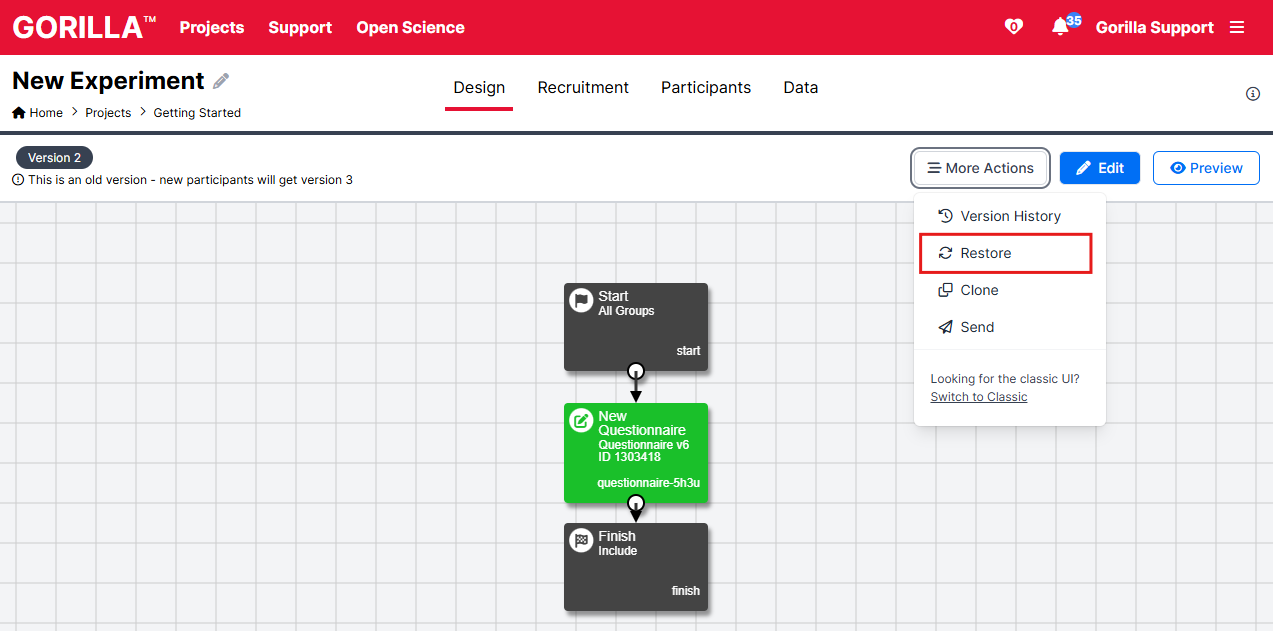
A confirmation window pops up. Click Confirm.
This commits a new version of your experiment with the same content as the version you restored. The commit description of the new version is 'Restore version [the number of the version you just restored]'.
Gorilla Glossary
This page includes a glossary to key terms used throughout the Gorilla tooling.
General
| Gorilla term | Definition |
| Clone | You can re-use your own tasks, questionnaires, or experiments - or those that have been shared by others - by simply copying a version into your own project. It's a huge time-saver, helping you build and share with ease. Have a look at our Cloning guide for more information. |
| Commit | Committing saves a version of your task, questionnaire, or experiment that you can return to anytime. This helps to track progress and prepare for testing or sharing. Tasks and questionnaires need to be committed to be added to experiments, and experiments need to be committed for participants to take part in it. |
| Experiment | The Experiment Builder is where you bring together tasks and questionnaires into an experiment participants can take part in. Here, you can visually lay out your experiment design, including randomisation, counterbalancing and more. All studies need to have an experiment built in the Experiment Builder as this is where you configure your participant recruitment and data collection. |
| Open Materials | Gorilla Open Materials is our contribution to Open Science. It's an open-access repository within Gorilla where you can publish your experiments, tasks and questionnaires. If you find relevant materials, you can clone them, edit them, and use them in your experiment. |
| Preview | Previewing allows you to view your task, questionnaire or experiment from a participant's perspective. It's a chance to ensure everything functions correctly. At the end of each preview, you can download the data to confirm your data are recorded as expected. Previewing is a simple but crucial step to ensure your experiment is ready to launch. |
| Project | Projects are where you build all of your tasks, questionnaires and experiments in Gorilla. You can think of each Project like a folder to keep your research materials organised. |
| Questionnaire | Use the Questionnaire Builder 2 to create surveys and questionnaires with multiple choice questions, rating scales, dropdown menus and more. If you need to control the timing or collect reaction time data, use the Task Builder tool instead. |
| Sample | Our Samples demonstrate how classic psychological tasks can be built in Gorilla. When logged in to your Gorilla account, you can access a searchable database of Samples to find exactly what you need. If a Sample fits your research, you can clone it into your own Project, edit it, and use it within your experiment. |
| Store | The Store is where participant scores and responses, can be saved for later use in the task, questionnaire or experiment. It enables branching of participants, rejecting low scores, redisplaying prior responses (piped text) and more! Our older tools and other platforms refer to this as embedded data. |
| Task | Use the Task Builder 2 tool to create stimulus-response, accuracy and reaction-time tasks using a wide range of stimuli and response options. Reaction time data is automatically saved to the data output! |
| Token | Gorilla charges one token per participant per experiment. The token represents the data that can be downloaded from an experiment. Find out more in our Pricing FAQs. |
| Version | A version is created when you commit a task, questionnaire, or experiment, capturing your progress as you build, test and share. You can use specific versions of tasks and questionnaires in experiments. New participants will complete the latest version of your experiment. |
Task Builder 2
| Gorilla term | Definition |
| Component | Components are the building blocks of an object. Each component has a unique function, allowing you to combine multiple components to create objects with custom functionality. As a simple example, you could combine an Image component and a Click Response component to create a clickable image object. See our Components guide for more information. |
| Display | Displays define your task's overall structure. A display is a group of one or more screens. For example, a Trial display might consist of three screens: a fixation cross, a stimulus screen, and a response screen. Listing the Trial display multiple times in the spreadsheet creates multiple trials. You can control which stimulus is shown on each trial by binding to the spreadsheet. |
| Object | An object is made up of one or more components working together. Combine components flexibly to achieve exactly the behaviour you want. |
| Screen | A screen is like a PowerPoint slide, where you present content and/or collect responses from your participants. By adding multiple screens within the same display (such as a fixation screen, a stimulus screen, and a response screen), you can create a sequence of events within a task. You can then reuse that sequence by listing the display multiple times in the spreadsheet. |
| Screen components | Screen components are components that function in the background of the screen, like scoring correct answers or setting time limits. You can find a full list of Screen components in the Screen section of the Components guide. |
| Spreadsheet | The spreadsheet is the driving force of tasks in Gorilla, controlling the order and repetition of displays. Each time a display is listed, all of its screens are shown in order. You can change content within a display on a trial-by-trial basis by binding components to the spreadsheet. You can also randomise the order trials are presented in by adding one of the spreadsheet randomisation components. |
Questionnaire Builder 2
| Gorilla term | Definition |
| Conditional Logic | Conditional Logic lets you control when a question appears in Questionnaire Builder 2. For example, you can show a follow-up question only if a participant gives a specific response. It ensures participants only see questions relevant to their answers. In other tools, this is often referred to as Skip Logic, or Display logic. Our Conditional Logic guide provides details on how this can be configured. |
| Object | In Questionnaire Builder 2, an object is the building block for creating questions or displaying content (such as images or audio). Each question type or block of content is a unique object. To ask participants a question, simply add the relevant Object to your page. Check out the available question types in our Objects guide. |
| Page | Each questionnaire is made up of one or more pages. On each page, add objects to ask participants questions. Participants move to the next page using the Next button, which is added to every page automatically. |
Experiment Builder
| Gorilla term | Definition |
| Experiment Tree | The Experiment Tree is where you visually lay out your experiment design, controlling the order of the experiment by connecting tasks and questionnaires together. |
| Node | Nodes are the building blocks of your experiment. Each task or questionnaire added to an experiment is an individual node. Every experiment begins with a Start node and ends with a Finish node. Control nodes are available to to easily add complex randomisation, counterbalancing and more to your experiment. A full list of the available nodes can be found in our Tree Nodes guide. |
| Recruitment Policy | Your Recruitment Policy determines how participants will be able to access your experiment. Options range from a Simple Link that can be shared on social media, email-based recruitment, or integrations with third-party recruitment platforms. Explore the Recruitment Policy guide to view all available options. |
| Recruitment Target | The Recruitment Target specifies how many participants you want to take part in your experiment. Each participant requires a token, so the Recruitment Target will also define the number of tokens allocated to your experiment. |
Premium tooling
As with all of the Gorilla tools, it is free to build your games, multiplayer tasks and shops. However, you will need a Standard subscription if you would like to collect data using one of the premium tools. Have a look at our Subscription guides to find out more!
| Gorilla term | Definition |
| Game Builder | The Game Builder tool allows you to build gamified tasks using animations and particle effects. Find out more in our Game Builder guides! |
| Multiplayer | The Multiplayer tool is a premium add-on with Task Builder 2. Multiplayer allows multiple participants to complete your task simultaneously and interactively using Text or Video chat to communicate. Find out more in our Multiplayer guides! |
| Shop Builder | The Shop Builder tool allows you to build simulated online shops to investigate consumer and purchasing behaviour, complete with your own product list, nudges, discounts and more! Find out more in our Shop Builder guides! |